Follow along and we’ll build a simple web contact form. It’s a simple form, but will give us insights into most of the features and benefits of the PeakZebra approach.
Right off the bat, let’s point out some key differences between the contact form we’re building and a typical WordPress contact form.
In the WordPress form, the typical outcome when the form is submitted is that an email is generated that sends you the data from the form. In some cases you’ll have the option to store the data in a file.
Note, though, that when that same user comes back to contact you again, they’ll typically need to fill out the complete form again and it will create a new email or record that isn’t connected with any previous messages the user has sent from this form.
In PeakZebra, a new Person record will be created the first time the user submits the form, along with an Interaction record that is tied to that user. Over time, as you gather additional information and input from that user, it will all be stored in that user’s record set. As you add new forms and new functionality to your website, the new pieces won’t exist in a vacuum–they’ll know who this user is.
So let’s get started.
Create Page and Set Context #
You’ll need to be logged in with Admin privileges to carry out the steps in this process.
For our CRM application, we’ll first create a page where the user’s name, email, and message can be input. To do this, we just select “New” from the top menu bar, then select “Page” from the submenu.
Let’s title this page “Contact Us”, which will create a page with a “slug” of “contact-us”, which is then used in the page’s URL: yoursite.com/customer (note that we’re assuming your site is configured to convert titles to slugs. This is the best setting for SEO.)
For the simplest sort of page, we don’t have to include anything other than a handful of PeakZebra blocks.
First, insert the PZ Context block. If you click on the block inserter button (the blue plus sign to the top left):
you’ll find all PeakZebra blocks in the PeakZebra section, or, to avoid scrolling down, just type “pz” in the search bar and all the blocks will be found and listed:
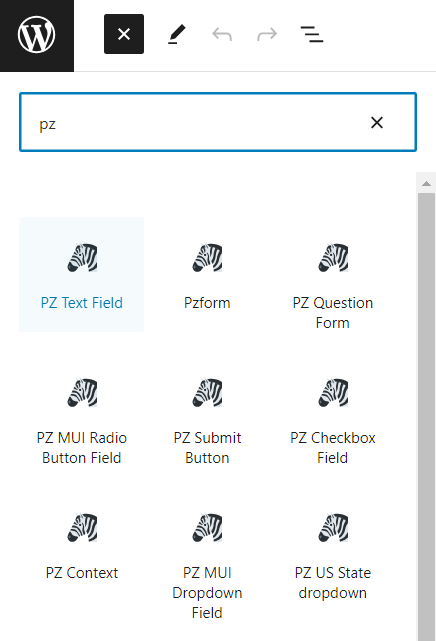
Click PZ Context and the block will appear in the editor as a simple text message:

If you click on the block’s text, the block edit panel on the right will show (if the panel is not visible, click the panel reveal button just to the right of the Publish button. Note that it’s also possible to configure the panel to appear elsewhere on the page, though by far the most common case is that it’s in the default location to the right).
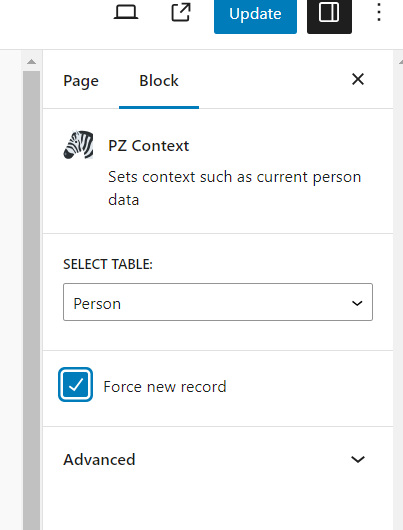
Here’s an important concept: in situations where we want to keep our attention on, say, the current customer we’re working with, the PZ Context block can “remember” who that customer is when we arrive on this page. If we are working with records in other tables that are tied to this person, we have the option of preloading those records.
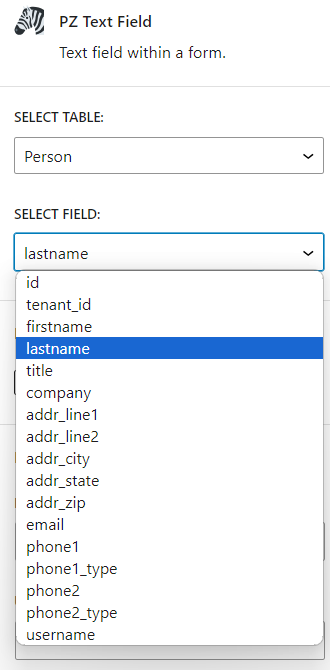
The Person Table #
We should take just a moment to talk about “persons”. Almost all of the records about people, no matter their role in the application, are stored in the Person table. The customers in our CRM application, for example, will be stored in the Person table. The only exception are prospects, who are stored in a duplicate of the Person table called Prospects, since this can be a very large group of records and the relevance of these prospects to our ongoing business has not yet been determined.
A number of “fields” are potentially stored for each person. Here’s the current full list:
| id | the person id – a unique identifier for each person | |
| tenant_id | a field reserved for PeakZebra internal use | |
| firstname | ||
| lastname | ||
| title | ||
| company | ||
| addr_line1 | ||
| addr_line2 | ||
| addr_city | ||
| addr_state | ||
| addr_zip | ||
| phone1 | ||
| phone1_type | whether home, office, mobile, etc. | |
| phone2 | additional phone number storage | |
| phone2_type | ||
| username | WordPress user account name (where needed) | |
| has_notes | flag to indicate notes have been tied to this record | |
| last_contact | date of last contact with the customer | |
| tags | may be used by applications to store non-heirarchical grouping information | |
| pz_level | used to track membership level (where applicable) | |
| pz_status | internal PeakZebra use | |
| pz_tags | internal PeakZebra use | |
| qna | stores results from questions asked of users in the PZ question block | |
| expires | used in membership scenarios | |
| created | record creation date |
On our current page, at least for the moment, we’ll assume we’re starting with a new customer, so we’ll reset the context by checking the “Force new” checkbox in the PZ Context configuration panel. This simply means that any form we place here will create a new Person record when the form is created. That’s the typical scenario for a “Contact Us” form, but we can come back later and retool our setup so that it recognizes users it’s seen before.
Create a Person Form #
Let’s continue on this page by adding the PZ Form block just under the PZ Context block.
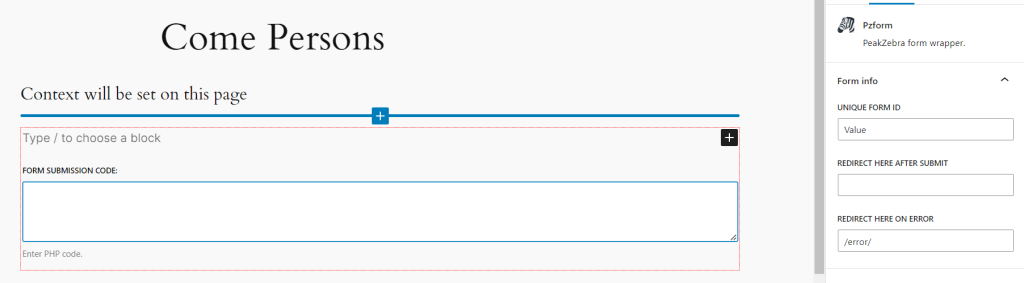
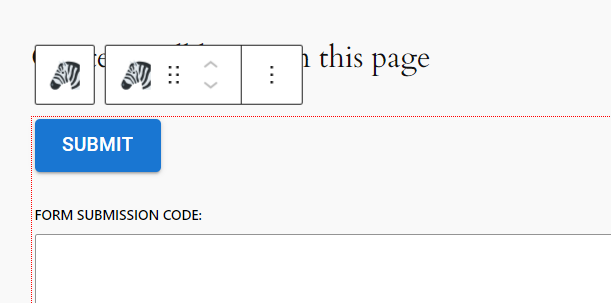
In the editor, the form block is surrounded by a red box (it doesn’t appear in the front-end view that the site visitors see). This just makes it easier to tell which things are within the form and which are not.
We’ll talk about the “Form Submission Code” edit field, along with the controls in the side panel, a little later.
We can insert any block we might want to into the form block, but most often what we’ll be placing there are form input fields–things like text fields, radio buttons, checkboxes, toggles, calendars, and the all important Submit button.
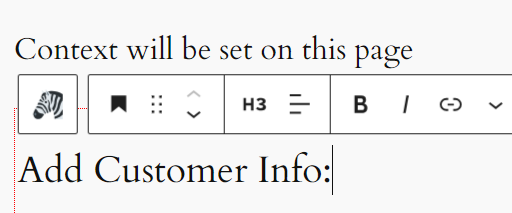
We can also add text and images, so let’s begin by adding a header at the top of the form. Click where it says “Type / to choose a block” and then choose Header. Let’s set the header block to H3 and type something like “Add Customer Info:”
Since we have to add a Submit button no matter what (or else the form won’t be submitted), let’s go ahead and add that by typing Ctrl-Y while still focused on the H3 block, then choosing PZ Submit Button.
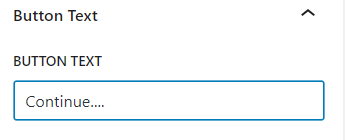
On the control panel for the block, note that we can change the text in the button. Let’s change it to say “Make Contact!…”
Note that you can also change the margin around the button.
Adding More Fields #
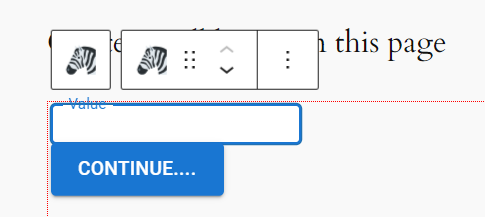
If you click Ctrl-T while focused on the button, you’ll add a new block just above the button.
Let’s insert a Row button here and indicate that we want two columns:
Let’s insert a PZ Text Field block here where we can collect the customer’s first name:
In the right-hand panel, we pick “Person” and “firstname” to control which field in the database we’ll be collecting data for.
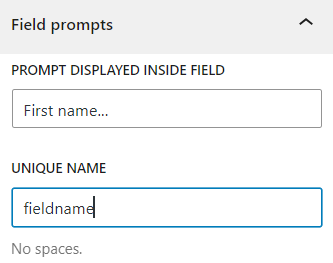
We also need to enter a value for the prompt that will appear within or on the top border of the field. The last field is the “unique name”. Unless you have a good reason to do otherwise, you should leave this set to the fieldname, which is “firstname” in this case.
And you can click the below Continue button for the next section of this tutorial.


