You can create custom fields in PeakZebra, but in most instances you’ll want to use standard fields. These are fields that are prebuilt in the PeakZebra database. When a form is submitted, PeakZebra knows where to store each standard field because it knows which element of the database a given field is assigned to.
There are several kinds of input fields in PeakZebra, but for the moment let’s just talk about text fields.
To place a single-line text field in a form, you use the pzTextField block.
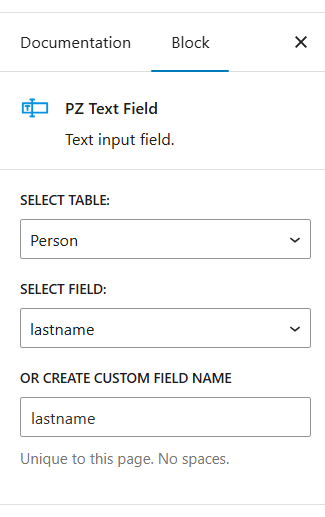
In the configuration panel for this block, you have several configuration options, beginning with selecting a table and a field within that table.

The table and field options let you say which element of the PeakZebra database you’d like to collect here.
The PeakZebra database is built with the idea that the data that is collected for typical business applications is fairly predictable. There will be customers with names and addresses. There will be telephone numbers, email addresses, and notes about interactions and support tickets.
At present, the base installation of PeakZebra contains a number of prebuilt tables, of which the ones you can presently assign form fields to are Person, Interaction, Project and Task.
By default, the Custom Field Name field is set to match whatever you chose for a field in the field dropdown. You do have the option of entering a custom name here. Doing so is a completely normal thing to do, but it will mean that PeakZebra won’t inherently know what to do with that field and the data it collects. By default, custom fields for a given table are strung together and stored in a person meta file. This process (and the reverse–unpacking the collection into individual custom field values) is transparent to you. Note, though, that it almost never makes sense to use a custom variable if there’s a standard field that will accomplish/store the same thing.
After you’ve assigned a table and field, there are a few more configuration items to consider:

The prompt field contains the text that appears above the field in the form. You can put whatever you feel is useful here.
The next field, parameter name, gives you the opportunity to pass the user input to this field as a parameter at the end of the URL for the next page (the success URL page you set in the form). If there’s nothing here, the value isn’t passed. You can put whatever you like here, except that you should avoid single letters as some of these are used by WordPress (“s” is used for search terms, for example).
SECURITY: Passing selected user input to the next page can be handy, but it should be used only where you’ve thought it through because it can lead to security issues. First, it puts data in the URL where it could potentially be seen by attackers monitoring your web traffic. Second, and more dangerous, is that attackers can put arbitrary values into the URL to see what data they might get access to. You wouldn’t want to pass a user id to a page with a form displaying that user’s data because an attacker could just try random id numbers to see which ones offered up user data. Generally speaking, the data will be available to you by pulling data that’s been stored in the database.
One way to use the passed data is the PeakZebra parameter shortcode.
Generally speaking, you should use a unique name for each field. The only requirement for names is that they not have any spaces (the prompts you show the end user can of course have spaces). These fields and the data entered in them will be forwarded to the email address you configure in settings. They’re sent in a “JSON” format and will need to be parsed out in one way or another to be used as individual fields.
The width field determines the width of the text input area as you’d expect. The “required” field means the form can’t be submitted until the field has a value entered, but there’s no indication of the field being required unless you also tick the Show Asterisk field.
The Multiline field let’s you set the field to handle more than one line of text, effectively making it into a Text Area field. Since there’s already a Text Area field, we suggest using that instead.
Finally, the Password Field checkbox causes asterisks rather than the entered characters to display in the field.
A final note about the JSON format used in emails — you may need to parse this data on your own. Here’s how to go about that in JavaScript.
If you’re processing the data in JavaScript, note that JSON.parse() converts a JSON string (which is a string representation of a JavaScript object such as an array) into a JS object, like so:
const json = '{"result":true, "count":42}';
const obj = JSON.parse(json);

console.log(obj.count);
// Expected output: 42

console.log(obj.result);
// Expected output: true
(This is borrowed from here.)


